Keep Printing At Home
I’ve been printing for a while now, and I’ve collected this gear slowly across that whole time. This art can have a low starting budget, but it’s easy to balloon that cost, so use this page as a reference, not a shopping list. Get only what you think you need, do your own research, and don’t hesitate to reach out for my opinion on anything here.
Jump to a step:
Step 1: Build the Screen
This is where every print starts. You’re stretching mesh tight over a frame, and that mesh is what your ink pushes through, so it needs to be drum-tight and square. You can build your own from cheap canvases like we did in class, which is why there’s a staple gun and pliers here, or buy a pre-made frame if you’d rather skip the stretching. The mesh count matters too: a lower number like 110 lets more ink through and is friendlier for beginners, a higher number holds finer detail.
Frames
Make your own — the good DIY option if you want a lot of frames
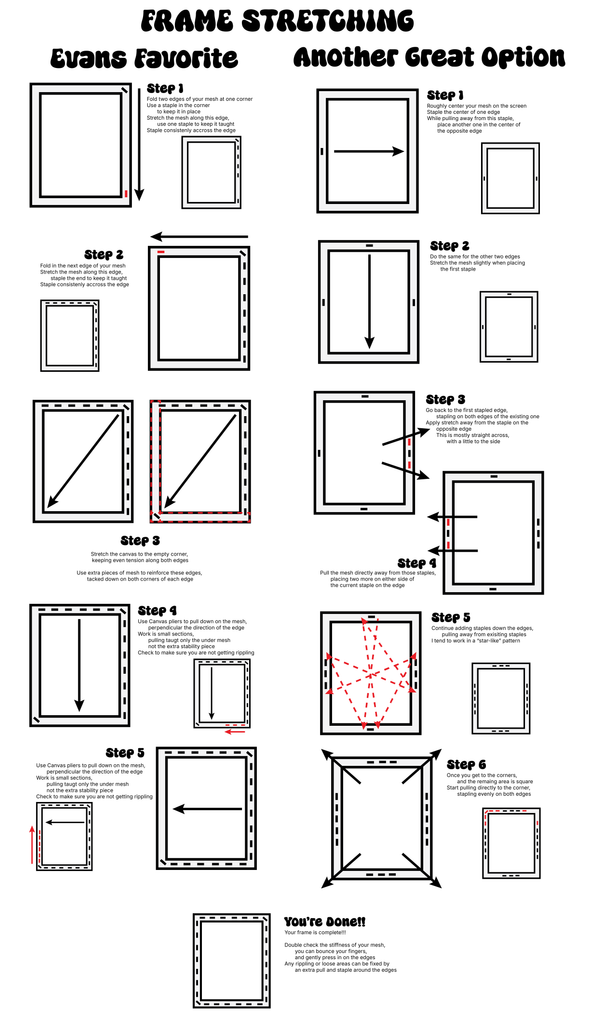
You need: a wooden frame — we use pre-stretched canvases, you can also use stretcher bars.
- Canvas we use: 5-pack 16×20 Super Value canvas by Artist’s Loft — Michaels. Sturdier than the same-price Walmart ones. Heads-up: 16×20 is the biggest these go without a crossbar, so going bigger means getting creative.
You need: mesh
- 110 (what we used in class) — Amazon. The beginner-friendly all-rounder.
- 160 (more detail) — Amazon.
- Higher number = finer detail but harder to push ink; lower = more ink, chunkier detail. 110 is the sweet spot to start.
You need: a way to stretch it
- Canvas pliers + staple remover — Amazon. I like these because they have rubber teeth and came with the remover, but pretty much any pliers will do.
You need: a staple gun + T50 staples
- Electric (what we used in class) — Amazon. So much easier on your hands across two frames, worth it if you can swing it.
- Manual T50 — Walmart, Walmart. These work, but they’re harder to use (we learned that firsthand!). Fine on a budget, your hand will just be tired.
- Staples: I get T50 staples from Walmart, but lots of retailers carry them. Get the ones that fit your gun.
Another option — buy your frames (no mesh, staple gun, or stretching needed, they come ready)
- Pre-made aluminum —
$$$— Blick, Amazon. Super consistent tautness, last a long time, professional. Expensive, and the mesh is fixed, you can’t re-stretch it, so check the mesh count before buying. - Replaceable-mesh wood frames —
$$— Blick, Blick (Speedball), Amazon. Wood with a channel to tension mesh into. Great if you use a product that doesn’t come off the screen, since the mesh swaps out easily. Sturdy and easy to use. You probably won’t need more than 2.
Step 2: Make Your Film
Before anything touches a screen, your design has to become a solid black shape on something clear. That’s your film. The black areas are what’ll eventually let ink through, so this is where “black is ink, white is not” becomes real. You can print your design onto transparency film with a laser or inkjet printer, or draw it straight onto the film by hand with paint pens. Whatever you use just needs to be transparent, so the light can pass through everywhere your design isn’t.
You need: transparent film for your black design
- What we used in class: Uinkit laser transparency film — Amazon. Made for laser printers specifically, but worked great with the acrylic paint pens too.
- Inkjet option (same brand): Uinkit inkjet transparency — Amazon. Or inkjet film from SPD (they don’t make a laser one, so I haven’t tried it, but I trust the brand).
- You can also try regular paper: many people rub a little oil into plain paper to make it more transparent. Works in a pinch, just keep in mind it may change your exposure times.
- If you go researching: you can use almost any film, just make sure it’s transparent. Match it to your printer (laser vs. inkjet) if you’re printing, or grab either if you’re hand-drawing with pens.
A printing tip: I had to print two layers of ink with my printer, because one pass is never opaque enough. Hold your finished film up to a light: if you can see your hand through the black, it needs another pass. You want it solid enough that no light sneaks through your design.
You need (if hand-drawing): acrylic markers
Pretty much any acrylic markers will do! You want these instead of, say, a Sharpie, because they’ll be opaque on your transparency. I got the ones I use from Walmart, but there are lots of options at different retailers. One popular brand is POSCA, but you do not need a brand name at all.
(Laser printer access: a print shop or library works if you don’t own one.)
Step 3: Coat the Screen
Here you coat the whole screen in a thin, even layer of light-sensitive emulsion and let it dry in the dark. Once it’s dry, the screen is ready to “catch” your design when you expose it. The tools here are about getting that coat even, a scoop coater does it best, but your printing squeegee will do in a pinch, and about giving it a truly dark place to dry, since stray light will start hardening the emulsion before you want it to.
You need: emulsion
- What we used in class: Ecotex PWR Water-Resistant Emulsion —
$$— SPD, Amazon. Ready to use, no diazo or mixing; long shelf life (12+ months); built for water-based ink, so it breaks down differently than plastisol-specific emulsions. I like the Ecotex line and ordering everything from SPD in one go, but the brand is not a requirement. - Another option: Speedball Diazo emulsion —
$— Amazon, Blick. The classic starting point, comes in lots of kits. (This is diazo/two-part, you mix in a sensitizer, and it has a shorter shelf life once mixed.) - If you go researching: match your emulsion to your ink. Most emulsions call out whether they’re meant for water-based or plastisol ink, and that’s an important distinction, don’t skip it. Separately: “ready to use / pre-sensitized” = no mixing; “diazo / two-part” = you mix a sensitizer in and use it sooner.
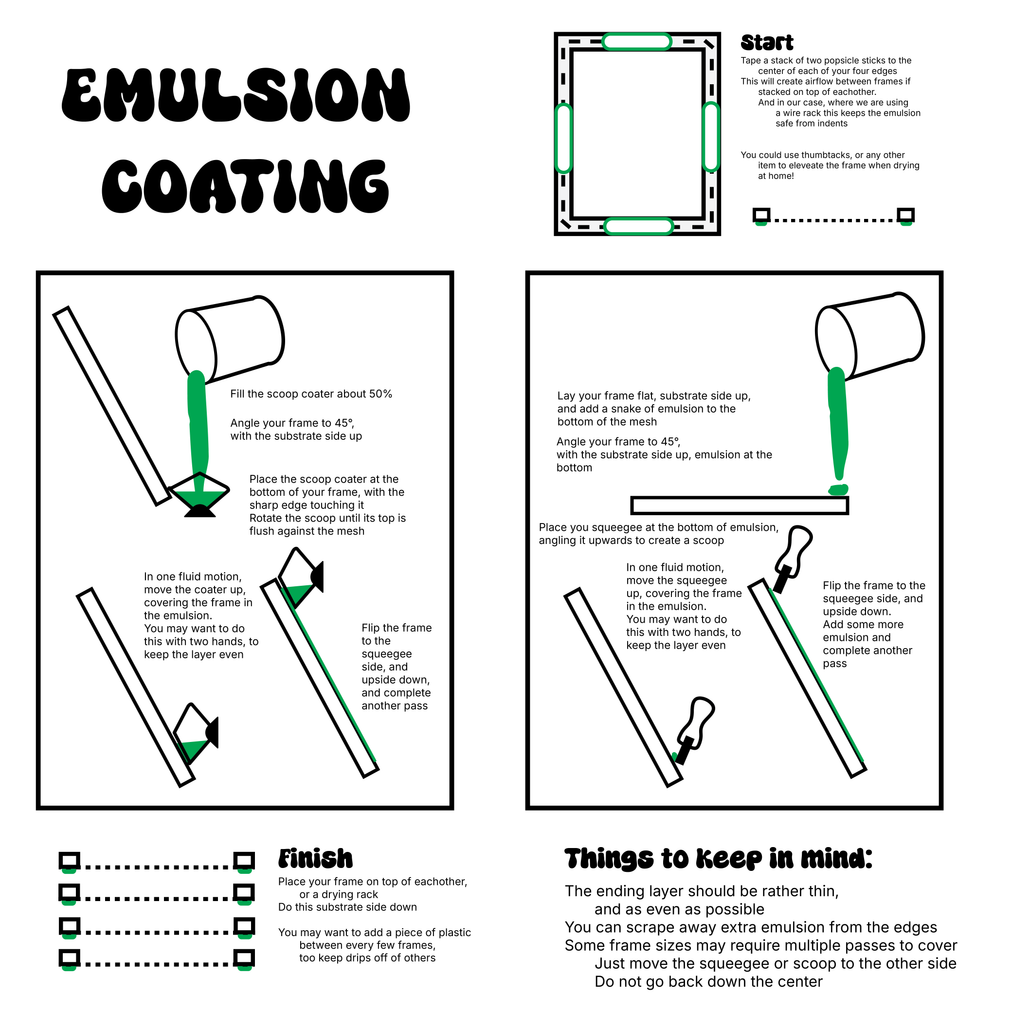
You need: a way to coat it
$$$Scoop coater — Amazon (3-pack), Blick. The one pricey thing I recommend above all else. Makes coating so much more consistent. I like a 3-pack for different frame sizes; if you’ll stick to one frame, get one.- “Free”: re-use your printing squeegee — you can absolutely coat with the squeegee you already print with. Less even, but it works and costs nothing.
You need: a dark space to dry (and a dim one to work in)
- While your coated screen DRIES: fully blackout, at least ~2 hours. This is not a “work fast” situation, the emulsion sits drying and any UV creeping in will start to expose it. Ecotex wants ~2 hours minimum; longer is better, and it varies by brand, so check yours. A closet, a covered box, or a blacked-out room all work, but it has to be genuinely dark the whole time. If you want to know all the items we used for the tent in our classroom, feel free to reach out!
- While you COAT, EXPOSE, and WASH OUT: just dim is fine. You’re working actively, so as little light as possible is good, but it doesn’t need to be pitch black. Amber (UV-filtering) lights are great here, they let you see without exposing your emulsion. Blackout curtains help too, as does working at night.
- “Free” / improvise: a closet or a big cardboard box for drying. Some people just drape blankets over a table and keep their frames underneath. Work at night for the rest.
- Amber light bulbs (nice to have) — Amazon, Amazon. Useful, but something I added later, if you work fast, regular lights are okay while coating and exposing.
Step 4: Expose
This is the step that transfers your design onto the screen. You sandwich your film against the coated screen and shine a UV light through it. Everywhere the light hits, the emulsion hardens and locks to the mesh; everywhere your black design blocks the light, the emulsion stays soft. Then you rinse, and the soft parts wash away, leaving an open stencil in the exact shape of your design. That’s why you need a real UV light source strong enough for your emulsion, and it helps to press the film flat with a piece of glass so the light can’t sneak under the edges.
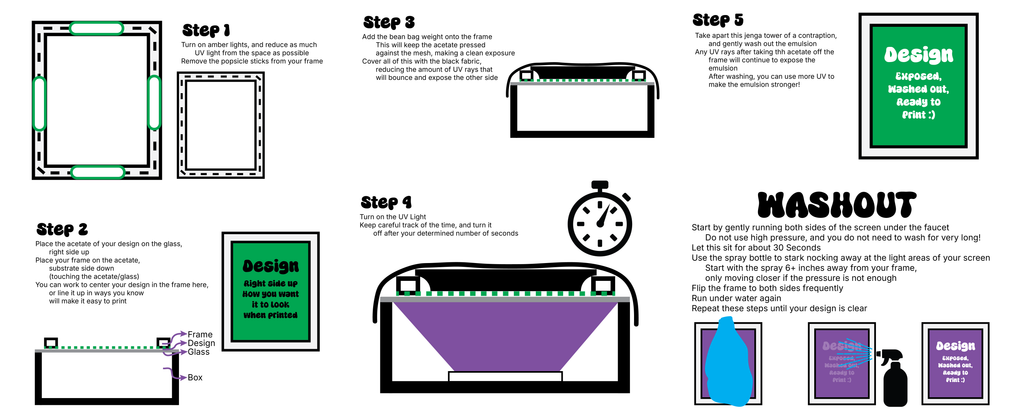
You need: a UV light source
- What I use: a UV light unit —
$— Amazon — came with a tripod if you don’t want to build a box like I did. - Another option: Speedball UV LED exposure lamp —
$$— Blick, Amazon. - Another option: SPD UV LED exposure unit —
$$$— SPD. - If you go researching: get one powerful enough for your emulsion, not a nail-art lamp or a flashlight. Match it to your emulsion’s exposure specs.
Two ways to set up your exposure
You can expose from the bottom up or top down, either works:
- Bottom-up (the class setup): a cardboard box (ours was from Staples) with the lamp inside, shining up through a sheet of picture-frame glass, into your design and mesh.
- Top-down: lay down black fabric, place your screen substrate-side up, film on top, glass to hold it flat, and your lamp about 12 inches above.
- Both setups need a UV lamp and black fabric, and both benefit from a piece of glass. Reach out if you want the specific build specs for the box we used in class.
Good to have: liquid tape. If there are any pinholes in your exposed screen, or little spots where emulsion washed away where you needed it, you can fill them back in. I use liquid tape — SPD. You can also just use more emulsion: dab it on, let it dry, and cure it in place.
You need: an exposure calculator
- Exposure time is the fussiest variable in the whole process, and a calculator takes the guesswork out, it shows you which exposure time holds your thinnest lines and clears your open areas.
- Free option: there’s a free printable one — Anthem Printing.
- Or make your own: I made mine, and you can too, either printed out or drawn with paint pens (same as your film). Making it yourself lets you fit it to your exact needs, the line thicknesses and open areas you actually use.
Step 5: Print
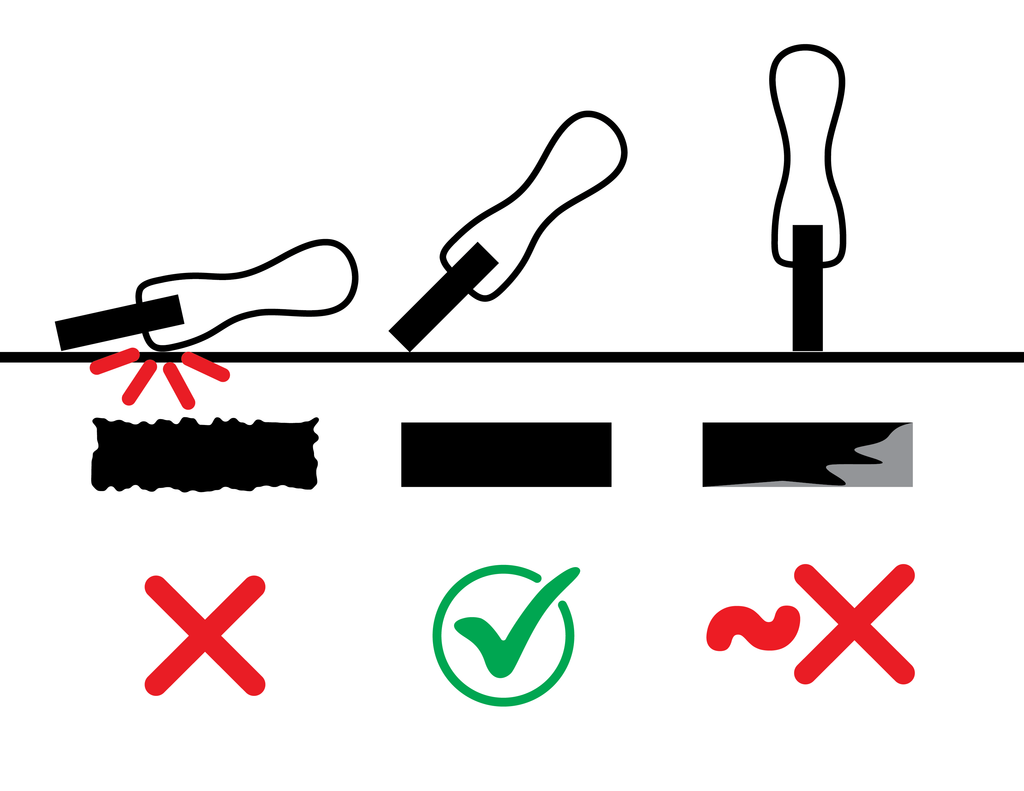
The part you came for. You flood ink across the screen and pull it through the open stencil onto your shirt, tote, or paper. The squeegee is your main tool, and the one thing worth being picky about, a firm edge and the right size give you a clean, even pull. Tape masks off the open mesh around your design so ink only goes where you want it.
You need: ink
- What we used in class: Speedball acrylic/water-based — opaque (for dark fabric) on Amazon, regular on Amazon and Blick.
- Brands I also trust: Jacquard; Blick’s own water-based acrylic fabric ink — Blick; SPD water-based ink — SPD.
- Kits: I started with ink kits (a few colors for one price), now I order individual colors as I like them. Find them at Michaels, or the classic starter kit on Amazon.
- If you go researching: look for water-based / acrylic, easier to cure and clean up. (Plastisol needs different emulsion and PPE.) Make sure it’s meant for fabric if that’s what you’re printing, and labeled “screen printing” (different inks have different thicknesses).
You need: a squeegee
- What I recommend most: 65 durometer with a sharp corner — Amazon. Those two things get me the cleanest, most consistent prints. Get one smaller than the inside of your frame, but bigger than your design.
- Others you’ll commonly find: Speedball squeegees — Amazon (12″), Amazon (medium), Amazon (graphic). Not my favorite, but worth experimenting with if they fit your budget or come in your kit.
Good to have: hinge clamps
Hinge clamps we used in class — Amazon. Not at all needed, regular bench clamps or a friend holding the frame works fine, but they make lining up and holding your frame down much easier. There are also lots of DIY solutions out there using different hinge styles (mine are literally just drilled to a board we had in the barn!), so look around for a style that fits your needs.
You need: tape (to mask your borders)
$clear packing tape — tape off the open mesh around your design. Cheap and works.$$screen-print block-out tape — SPD, Blick. Look for one meant for water-based inks.
You need: something to print on
- Shirts, totes, paper, or fabric yardage (great for cutting and sewing into something after) — covered on Placement.
- Slide parchment or wax paper between the layers of your shirt so ink doesn’t bleed through to the back. In class we just worked on a tabletop, that’s all you need. (You can use a printing board if you want, but it’s genuinely optional, we didn’t.)
Step 6: Reclaim (optional)
Here’s the step that means you’re never really done. When you’re finished with a design, you don’t retire the screen, you reclaim it. A little emulsion remover strips your old design right out of the mesh and the screen goes back to blank, ready for the next idea. One frame can hold design after design over its life.
This is also why you don’t need a pile of frames, and why running an exposure calculator (or any experiment) isn’t a risk: if a screen doesn’t come out how you wanted, you just reclaim it and try again. No frame is ever a written-off failure. That safety net is why I love using emulsion over some other frame-making options, I don’t have to stretch a new screen every time. I highly recommend getting the supplies to reclaim a frame, and once you’re done with your class design, starting a new one on the same frames we stretched together!
You need: emulsion remover
- What we used in class: Ecotex Emulsion Remover —
$— SPD, Amazon. Same Ecotex line, not a requirement, I just like the EcoTex brand and ordering all-in-one from SPD. - If you go researching: any screen-printing emulsion remover works. Some are stronger than others, so I tend to stick with one brand, but most will handle whatever you use.
Good to have: a scrub pad & degreaser
- Scrub pad — SPD. Helps work the remover into the mesh. “Free”: any old sponge or nylon brush will do.
- Degreaser — most of the time I just use Dawn dish soap. If you want a dedicated product, look for “screen degreaser” — Ecotex mesh degreaser on SPD. Degreasing a fresh screen helps emulsion stick evenly; a quick Dawn wash covers it for most people.
Just want it all in one box?
Speedball all-in-one screen printing kit — Amazon, Michaels. A really great way to get everything at once. Look for one with all the pieces you care about, I’d want a frame, emulsion, squeegee, ink, and a UV light. Speedball makes kits for different techniques, so check exactly what’s included before buying.
That’s the whole kit! Remember, you don’t need all of it, and you don’t need the fancy version of most of it. Build one screen, and you can print on it forever. Reach out anytime if you want my opinion on a specific piece of gear, or the build specs for that exposure box. Keep printing!