Placement & Size
Pick a size to design at, keep it under our 12×16 max, and don’t sweat exact positioning, we’ll nail that together in class.
Two questions this page answers: how big should my design be? and where does it go? The first one matters most for your at-home prep, because you’re designing at final size (remember!), so you need to pick your dimensions before you start. The second one, exact positioning on the garment, we’ll dial in together when you’re printing, so treat it as helpful guidance, not homework.
These ranges are the general rule at most print shops, and tend to “just look right” on garments. They’re a great place to start.
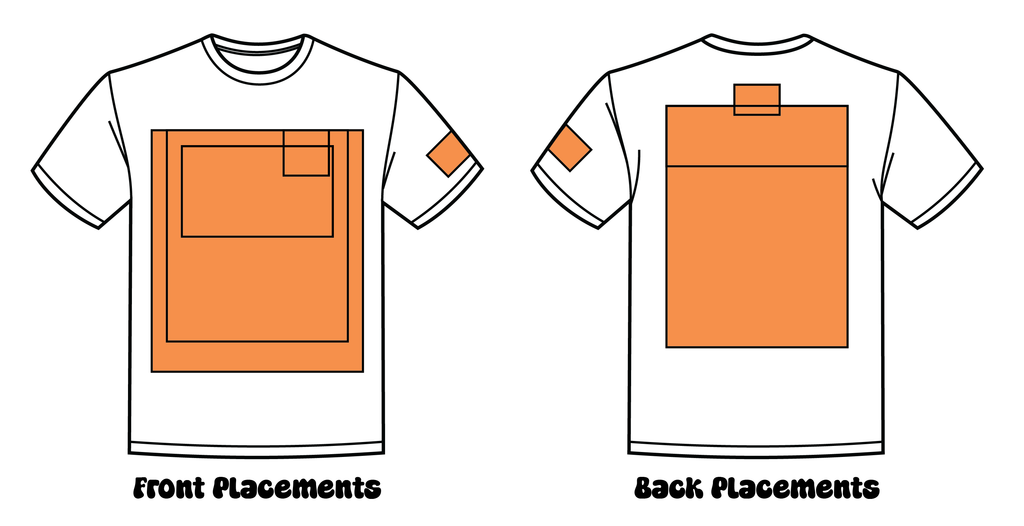
The quick version
Here’s every location and its good-size range in one place, bookmark this.
| Location | Good size range (W × H) |
|---|---|
| Left Chest | 2.5–5″ wide × 2.5–5″ tall |
| Center Chest | 6–10″ wide × 6–8″ tall |
| Full Front | up to 12″ wide × 10–14″ tall |
| Oversize Front | 12–14″ wide × up to 16″ tall |
| Back Collar / Nape | 2–3″ wide × 1–2″ tall |
| Upper Back | 10–14″ wide × ~4″ tall |
| Full Back | up to 14″ wide × up to 16″ tall |
| Sleeve | 1–4″ wide × 1–4″ tall |
| Tote | up to ~12 × 12″ |
Everything tops out at our 12×16″ printable max. That’s the ceiling set by the screens we’re building this weekend. Design bigger later with a bigger screen, but for class, 12×16 is the wall.
Heights are approximate and depend on your design’s proportions, but knowing the rough shape helps, especially for the wide-and-short spots (upper back) and the small-and-square ones (left chest).
How big can it be? (the max)
Your design can’t exceed about 12×16 inches, that’s the printable area of the frames we’re building.
Ranges are flexible, the maximum isn’t. Our frames give a printable area of about 12 inches wide by 16 inches tall, so that’s the hard ceiling for anything you print this weekend, no design on any garment can be bigger than that. (It’s not a forever-limit, a bigger screen down the road means a bigger max. It’s just our wall for class.)
Design at your final size (yes, again, it’s the golden rule). Whatever size you choose from the ranges here, build your file at exactly that size. A 10″ design is a 10″ file. This is the same rule from Keeping It Printable, and it’s the thing that makes every number on this page actually work.
Two free ways to get size right at home:
Raid your closet. Grab shirts (or totes) you already own and love the print size on. Measure that print with a ruler, boom, that’s your target size, proven on a garment you already like. Way better than guessing.
Print & tape. Print your design at full size on paper (tile it across multiple sheets if it’s big, then tape together), and lay it on the actual garment. You’ll see exactly how big it reads in real life before you ever burn a screen. Nothing beats seeing it at true scale on a real shirt.
You can fit more than one design per frame
Each frame’s 12×16 space can hold one big design or a few smaller ones, in any mix, and there’s no pressure to fill every inch.
Here’s the fun part thats easy to miss: that 12×16 is the whole frame, not the size of one design. It’s yours to divide up however you like. A frame could hold one design that fills the whole 12×16, or a few smaller ones that each come in well under that, in any combination. Picked a full-back design but there’s still open space beside it? Drop a little pocket-sized design in there too. Anything you can fit, you can print, so think of the frame as space to fill, not a single slot.
Spacing them out. If you’re putting multiple designs on one frame, give them a little breathing room so they print cleanly and you’ve got space to line up the garment under each one. Aim for at least 2 inches between designs, 3 is even better. That’s a soft guideline, not a hard rule, if your layout wants to break it, go ahead, we’ll make it work in class.
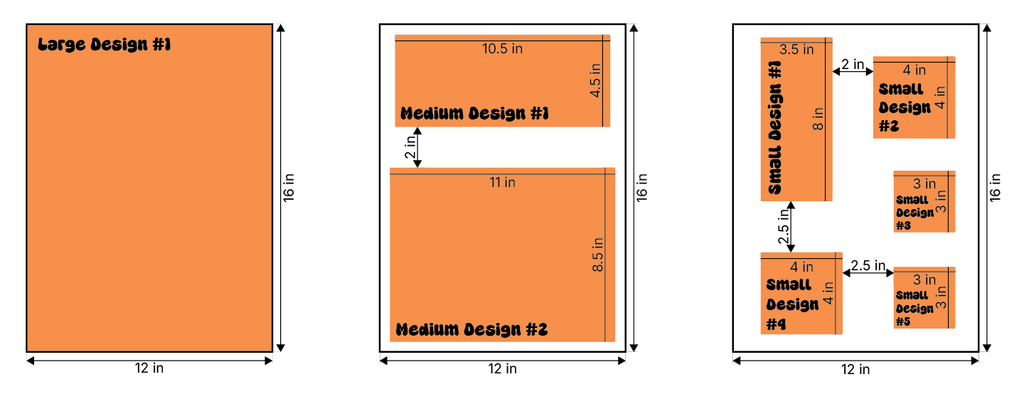
And you don’t have to fill it! If you’ve got one clean design you love, or one frame’s worth of designs, that’s wonderful, let’s make it. You can always leave the second frame open for experimenting, or for a last-minute idea that strikes once you’re in the studio. There’s no quota here, just room if you want it.
Where it goes: the front
The classic front spots and their good-looking sizes, solid starting points, not rules.
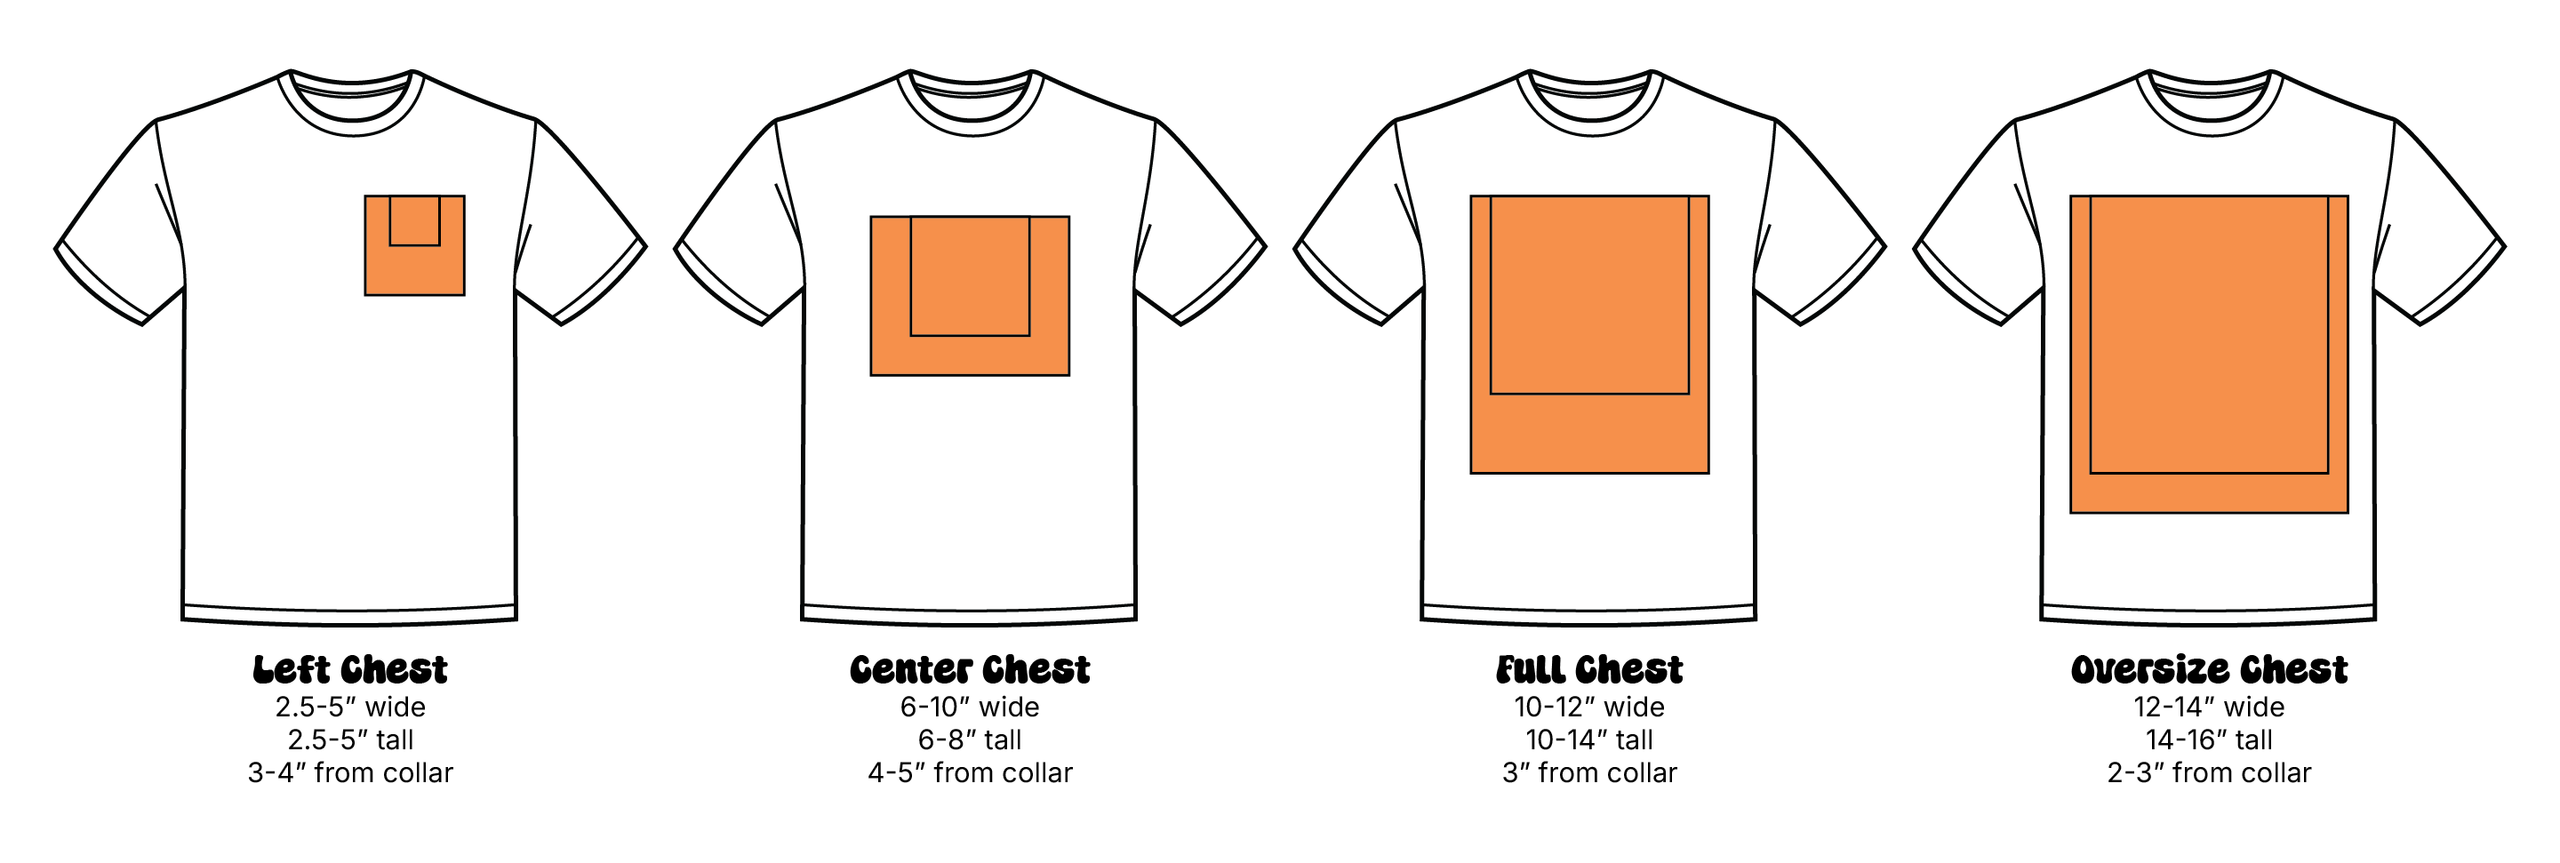
Quick tour (all sizes are good-looking starting ranges, you can always break the box):
- Left Chest, 2.5–5″ wide × 2.5–5″ tall. The classic small logo spot, on the wearer’s left. Keep it simple, detail gets lost small. This size design is also great for patches or stickers!
- Center Chest, 6–10″ wide × 6–8″ tall. Bigger than a left chest, centered, often wider than it is tall. Stays visible even under an open jacket. A great area for text
- Full Front, up to 12″ wide × 10–14″ tall. The most common spot. Big and central.
- Oversize Front, 12–14″ wide × up to 16″ tall. Bigger than standard, sits a touch higher. Very trendy currently.
Where it goes: the back
The back gives you the biggest canvas, great for your boldest, most detailed piece.
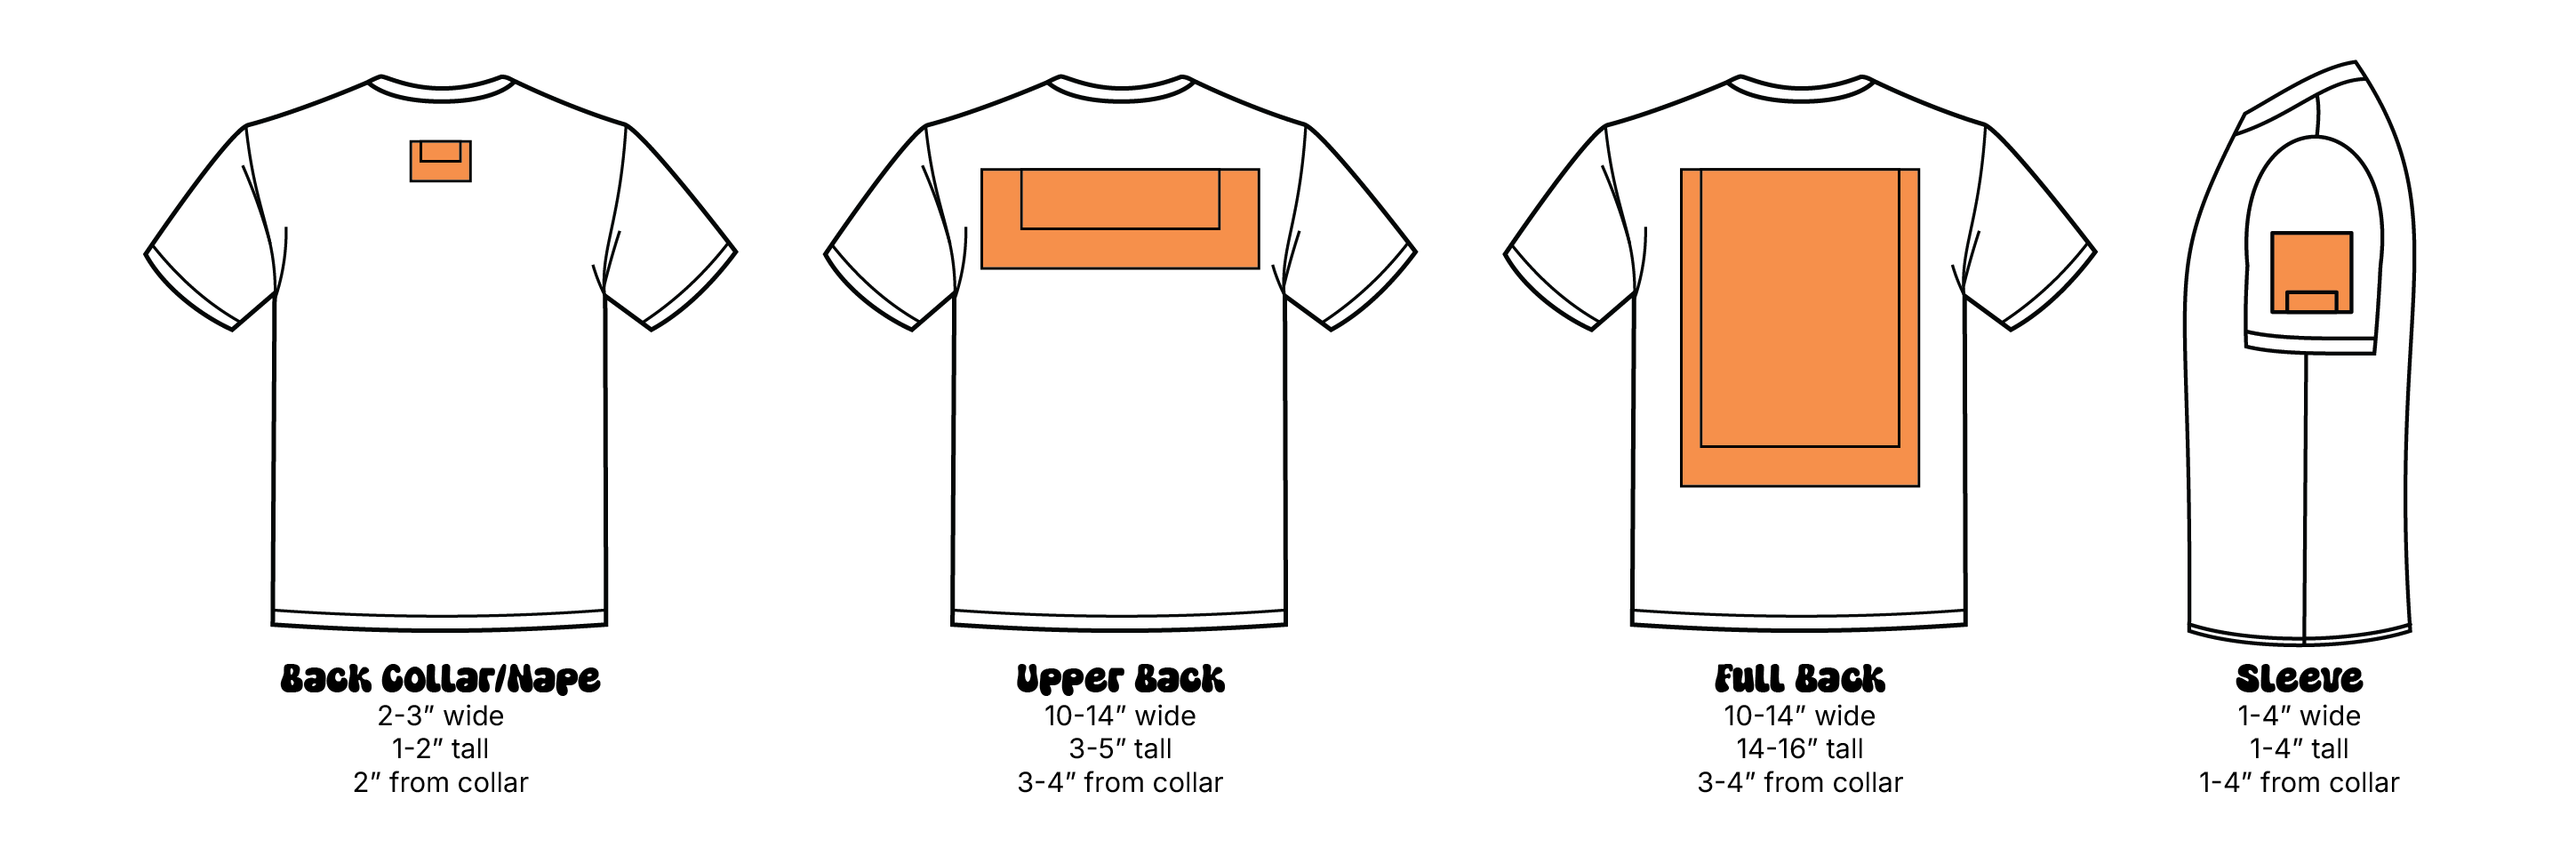
- Back Collar / Nape, 2–3″ wide × 1–2″ tall. Small, just below the collar. Eye-level in a crowd, so it doesn’t need to be big.
- Upper Back, 10–14″ wide × ~4″ tall. Across the shoulder blades, the “EVENT STAFF” zone. Wide and short so it reads from across a room.
- Full Back, up to 14″ wide × up to 16″ tall. The big billboard. Great for your most detailed or elaborate piece. Pairs classically with a left chest on the front.
- Sleeve, 1–4″ wide × 1–4″ tall. Small and simple. Looks best modest, about an inch from the hem.
Where it goes: tote bags
Totes give you about a 12×12″ print area, usually centered, a great, forgiving surface.
If you go with a studio’s tote (they’re 13.5×13.5″ or 13″x15″), you’ve got a usable print area of about 12×12″, limited by both the bag and our frame. Totes are a forgiving, fun surface: flat, sturdy, and a centered design almost always looks right.
Placement is usually centered, or slightly above center. Same tricks apply, measure a tote you like, or tape a paper mockup on to check the size.
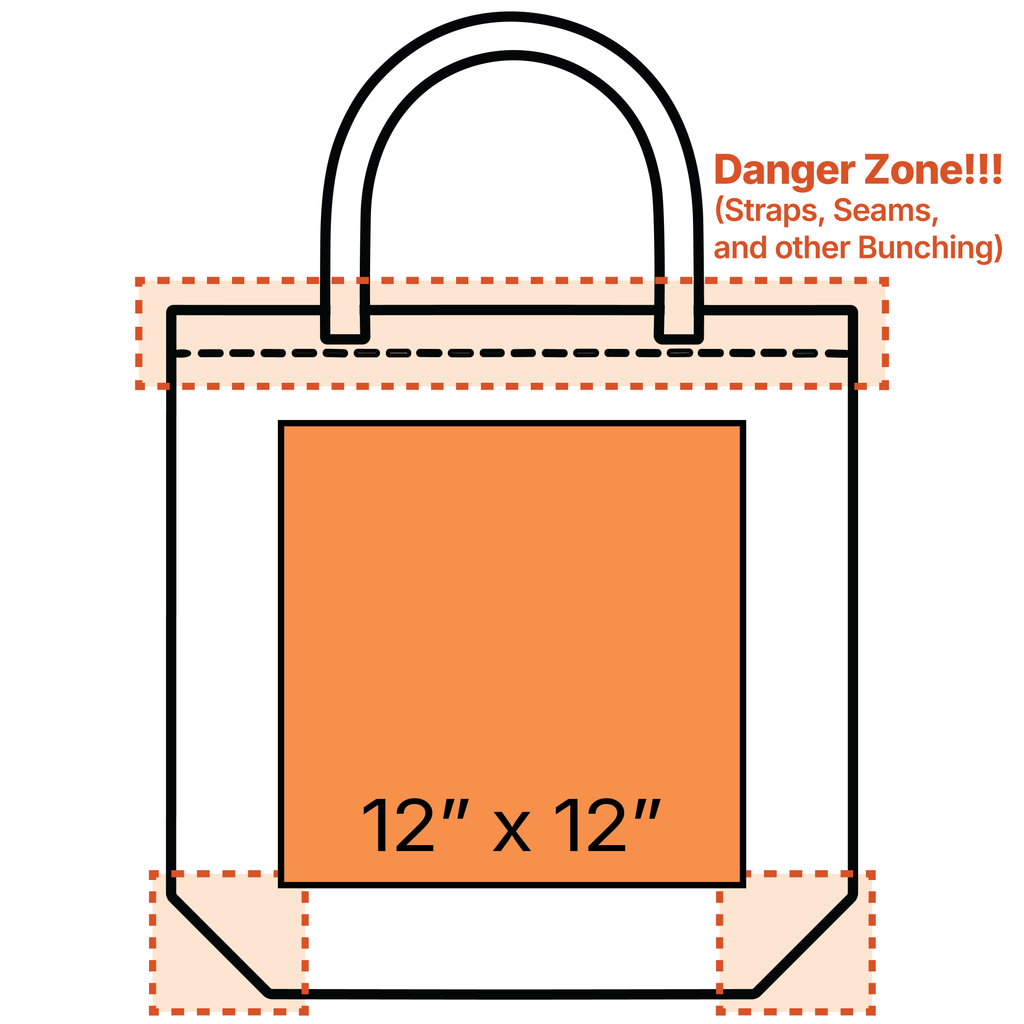
One heads-up on straps. Where the straps attach, the bag bunches and thickens, so keep your design out of that zone up top, or it’ll print onto uneven, bulky fabric. Center it, give the straps room, and you’re set.
If you are thinking about bringing your own tote, just check that the straps are well out of the way, and even better if they are attached only on the top of the bag, not going through the middle.
Where it goes: paper prints & posters
Paper’s a great surface too, any size you can source, as long as your design still fits our 12×16 max.
Shirts and totes aren’t the only things you can print on! Paper makes for great posters and art prints, and it’s a fun way to use a design a second time. I’ll have some 12×18, 100lb paper at the studio for you to use. But you’re also welcome to bring your own at whatever size you like, a bigger sheet with a nice border, a little postcard, whatever you’re picturing.
Two things to keep in mind. First, the same rule applies as everywhere else: your design still can’t exceed 12×16, because that’s the size of the screen, no matter how big your paper is. A giant sheet just means more border around the print. Second, if you’re sourcing your own, go for a decent cardstock weight (right around 100lb is perfect) and something not too textured, a smooth, sturdy stock takes the ink cleanly and won’t buckle. Flimsy or heavily textured paper fights the print.
A note on shirt sizes
Designing for a smaller or youth size? Scale down a bit so it doesn’t overwhelm the garment.
One quick thing: the same design that looks great on a medium can be oversized on a youth small. If you’re designing for a smaller size, think about scaling it down a touch (a rough 15–20% for youth sizes is a good instinct) so it stays balanced. Bigger sizes can usually take the standard sizes as-is. And you guessed, this is a perfect moment to raid your closet: measure a print on a shirt that’s the same size as the one you’re making, and match it.
Feel free to break these rules! Every range on this page is a helpful convention, not a law. If your gut says a design wants to be bigger, smaller, off-center, tiny in a corner, or sprawling to the edges, trust it. Your eye matters more than any number here. The ranges keep you safe when you’re not sure, your taste takes over the moment you are sure. (And exact positioning we’ll finalize together on printing day anyway, so there’s zero pressure to nail it alone.)
That’s size and placement. Pick a size from the ranges, keep it inside 12×16, design at that exact size, and we’ll place it together. When in doubt, raid your closet or tape up a paper mockup, real-world proof beats guessing every time.